My kids love turtles, and after seeing a few this spring on local hikes, we came up with a turtle-inspired craft. This is a great way to get kids using their creativity, and learning about turtles!

Supplies you will need:
~ small paper or plastic plates (or you can use paper)
~ construction paper
~ tissue paper in various colors
~ glue, and a brush to spread the glue
~ scissors
~ anything you might want to decorate with: sequins, beads, markers, etc.

Start by cutting up the tissue paper into approximately 1″ square pieces. I do this part for my kids, but if they have the dexterity and patience, they can do this step on their own.

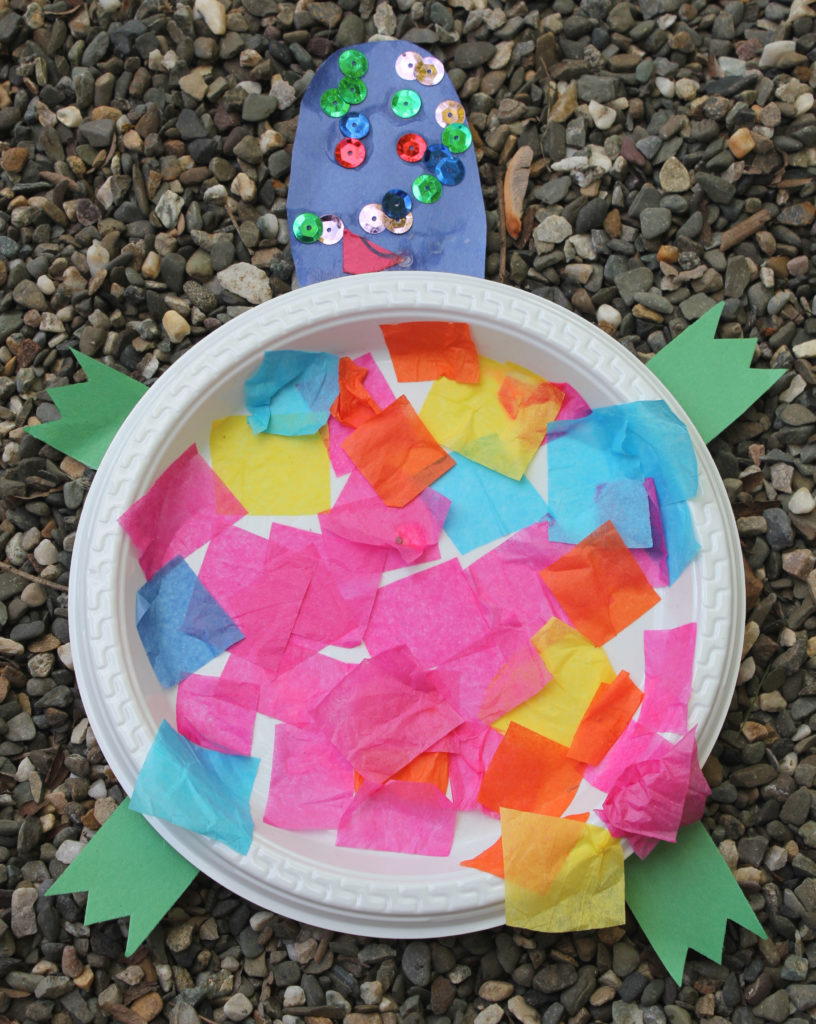
Decorate your plate (or large circle of paper). I was planning on turning the plates upside down before decorating, but the kids insisted on leaving them right side up, so you can choose whatever you think works best. If you use paper, it can get a little soggy, so you want to make sure it is thick enough.

My 3 year old stuck tissue paper on randomly, and my 6 year old came up with a design, so use your imagination!

Add on legs and a head (and a tail if you want as well). These can really be whatever colors you like. We cut the legs and head out of construction paper and made them long enough so they could be glued onto the plate.

Decorate a face on your turtle. You can use markers to draw, or just about anything you might have on hand. For example, eyes can be buttons, beads, sequins, or even Cheerios! If you want to make your turtle extra unique, you can get custom stickers online, by using this sticker maker.
We had fun with our projects, and you can always use crafts like this as an educational tool. Topics for this craft might include:
~ differences between land and sea turtles
~ colors of real turtles
~ patterns and colors


This is simple yet fun to do. I think my kids will.fall in love with this craft.
My nieces and nephews love pets and turtles too! That craft looks like fun and it is not too complicated for everyone to make.
This would be a lot of fun to do with my nephews.
This would be a fun craft to do with my grandkids. They look so cute.
So easy to do, I’ll suggest this to my nephews.
This is so cute. I can’t believe it’s just made with tissue papers.
This is such a cute craft for the kids. I bet they had a lot of fun with this one.
What a nice tutorial. I have this activity lined up for my son as part of his occupational therapy so this is very timely.
That is such a cute craft. My daughters love doing crafts like these. I’ll have to show them this to see if they’d like to do them too.
This is such a cute sounding craft to do with children, I get some tissue paper bits which would be perfect for this in boxes as well! Great way to recycle.
OMG! So easy and so much fun to make this turtle craft! Love it!
This is the cutest thing I’ve seen today. I’ve spent a few times doing crafts with my nieces before the lockdowns and I wish I knew about Mosaic Turtle Craft. Would love to try it with them once the lockdown has been lifted. Thank you for the wonderful idea!
My niece loves turtles (like me ) 😍And she loves craft activities too! She’ll def enjoy making this cute mosaic turtle craft.